
Are you considering installing your own floors but feeling overwhelmed by the process? Don’t worry, we’ve got you covered! In this comprehensive step-by-step guide, we will walk you through the entire process of installing your own floors, empowering you to tackle this project with confidence and achieve professional-looking results. Say goodbye to costly installation fees and hello to the satisfaction of a job well done. Let’s dive right in!
1. Planning and Preparation
Before you embark on any flooring installation project, proper planning and preparation are key. Start by measuring the dimensions of the area you plan to cover and determine the type of flooring material that best suits your needs and style.
Once you’ve selected your flooring material, it’s time to gather the necessary tools and materials. This may include items such as a tape measure, saw, adhesive, underlayment, and safety equipment. Having everything on hand before you begin will save you time and frustration during the installation process.
2. Subfloor Inspection and Preparation
Before installing your new floors, it’s important to inspect the subfloor for any damage or imperfections. Clean your subfloor properly. Remove any existing flooring or carpeting and repair any damaged areas. A smooth and sturdy subfloor will provide a solid foundation for your new floors.
3. Underlayment Installation
The underlayment plays a crucial role in providing stability, moisture resistance, and noise reduction for your floors. Follow the manufacturer’s instructions to install the appropriate underlayment for your flooring type. Carefully lay out the underlayment, ensuring a snug fit without any gaps or overlaps.
4. Flooring Installation
Now comes the exciting part—installing your chosen flooring material! The specific installation process will vary depending on the type of flooring you’ve selected, so be sure to refer to the manufacturer’s guidelines for detailed instructions. Here, we will provide a general overview of the installation steps for some common flooring types:
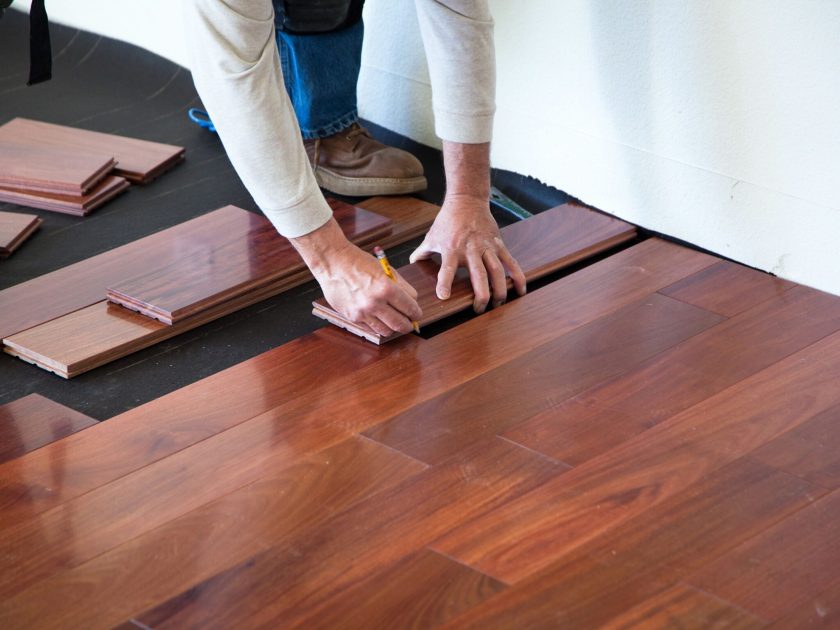
a) Hardwood Flooring:
- Start by laying the first row of hardwood planks against the longest wall in the room, leaving a small gap between the planks and the wall for expansion.
- Use a pneumatic nailer or flooring stapler to secure each plank to the subfloor, ensuring a tight fit between the boards.
- Continue installing the remaining rows, making sure to stagger the end joints for added stability and visual appeal.
- Trim the last row to fit, leaving another small expansion gap, and install the baseboards or moldings to cover the gaps around the perimeter.
b) Laminate Flooring:
- Begin by placing the first row of laminate planks against the longest wall, with spacers to maintain a small expansion gap.
- Connect the planks using the manufacturer’s recommended locking system, typically a tongue-and-groove mechanism.
- Continue installing subsequent rows, ensuring proper alignment and interlocking of the planks.
- Trim the last row to fit, leaving an expansion gap, and install the necessary transition moldings.
c) Vinyl Flooring:
- Start by preparing the vinyl planks or sheets according to the manufacturer’s instructions, which may involve acclimation to the room’s temperature and layout planning.
- Lay out the first row of planks, leaving a small expansion gap, and connect them using the manufacturer’s recommended method.
- Continue installing additional rows, ensuring a snug fit and proper alignment of the planks.
- Trim the last row if needed, leaving an expansion gap, and install the appropriate transition strips or moldings.
5. Finishing Touches
Once your floors are installed, it’s time to add those final touches that will enhance the overall appearance and longevity of your new flooring Dubai. Steps to consider!
- Remove any installation debris and thoroughly clean the floors to remove dust or residue.
- Apply a recommended floor sealer or finish to protect the surface and enhance its durability.
- Install baseboards or moldings to cover the expansion gaps around the perimeter of the room.
- Place protective pads or felt furniture glides on the bottom of furniture legs to prevent scratches and dents.
- Use doormats at entryways to minimize dirt and debris from being tracked onto the floors.


