
In this comprehensive guide, we will delve into the intricacies of tying a tie with precision and finesse. Whether you are getting ready for a formal event or simply aiming to elevate your everyday style, mastering the art of tying a tie is essential. We will explore various popular knot styles, step-by-step instructions, and useful tips to ensure that you always look sharp and sophisticated. Follow along closely, as we unravel the mystery of tying a tie with ease and confidence.
Preparatory Steps
Choosing the Right Tie for the Occasion
Before diving into the process of tying a tie, it is crucial to choose the right tie for the occasion. Consider the formality of the event and the overall dress code. A silk tie is a safe and versatile option that can work for both formal and semi-formal occasions. However, for more casual events, a knit tie or a cotton tie might be more appropriate.
When selecting a tie, also take into account the color and pattern. Solid colored ties are timeless and can be easily paired with a variety of shirts and suits. If you opt for a patterned tie, ensure that it complements rather than clashes with the rest of your outfit.
Factors Affecting Tie Selection: Fabric, Length, and Width
Choosing the right tie also involves considering factors such as the fabric, length, and width. Silk ties are a classic choice that exude elegance, while wool ties provide a more textured and casual look. The length of the tie should allow it to reach the belt line when tied, and the width should complement the width of your lapels.
- Consider the fabric of the tie: silk for formal occasions, wool for a more casual look.
- Ensure the length and width of the tie are appropriate for your body type and the style of your outfit.
After carefully considering these factors, you will be able to select a tie that not only complements your outfit but also enhances your overall look.
- Choose a tie that matches the formality of the event and complements your outfit.
- Pay attention to the color, pattern, fabric, length, and width of the tie to ensure a cohesive and stylish look.
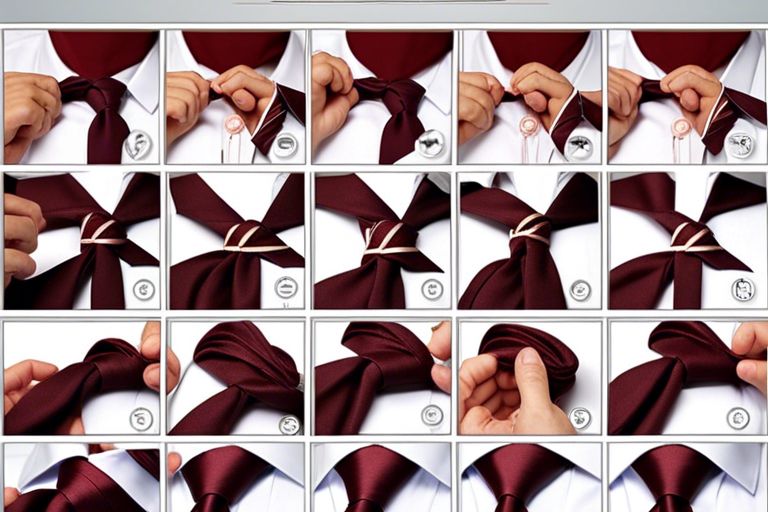
How-To Guide for Tying a Basic Knot
Some may find the task of tying a tie a daunting one, but with a little practice and guidance, anyone can master the art of tying a basic knot. In this guide, we will walk you through the steps of tying a classic Four-in-Hand knot, a versatile and timeless option suitable for a variety of occasions.
The Four-in-Hand Knot: Step-by-Step Instructions
Within the realm of tie knots, the Four-in-Hand knot reigns supreme for its simplicity and elegance. Follow the step-by-step instructions below to achieve this classic knot:
| Step 1 | Begin with the wide end of the tie on your right, extending roughly 12 inches below the narrow end on the left. |
| Step 2 | Cross the wide end over the narrow end. |
| Step 3 | Bring the wide end under the narrow end, forming a loop. |
| Step 4 | Pass the wide end through the loop around your neck. |
Tips for Perfecting the Four-in-Hand Knot
Tying the Four-in-Hand knot is an essential skill for any well-dressed individual. To ensure your knot looks sharp every time, consider the following tips:
- Use a mirror to adjust the length and tightness of the knot for a polished finish.
- Avoid pulling the knot too tight, as this can distort the fabric and create an unflattering look.
For instance, when choosing a tie for the Four-in-Hand knot, opt for a mid-weight tie with a subtle texture for added visual interest. Remember, practice makes perfect, so don’t be discouraged if your first attempts are not quite perfect. With time and patience, you’ll be tying the Four-in-Hand knot with ease and confidence.
- The key to a well-executed Four-in-Hand knot is attention to detail and practice.
Advanced Tie Knots
Now that you’ve mastered the basics of tying a tie, let’s delve into some advanced tie knots that will elevate your look and make a style statement.
How to Tie a Half Windsor Knot Half Windsor knot is a versatile option that works well with most shirt collars. Start by draping the tie around your neck with the seam facing out. Cross the wide end over the narrow end, then wrap it behind the narrow end and bring it up through the loop near your neck. Pull it down and across to the other side, then loop it through the front, and finally, pull it down through the loop around your neck. Tighten and adjust as needed.
The Half Windsor knot is perfect for a professional look that isn’t too bulky. It’s great for everyday wear and pairs well with a variety of shirt styles. Practice this knot a few times to get the hang of it, and soon you’ll be tying it with confidence.
Mastering the Full Windsor Knot Windsor knot is a classic and sophisticated choice that is ideal for formal occasions. To tie a Full Windsor knot, start by crossing the wide end over the narrow end, then bring it up through the loop near your neck. Wrap it around the narrow end and bring it back up through the loop. Cross it over to the other side, then loop it through the front and bring it down through the loop around your neck. Tighten and adjust as needed.
The Full Windsor knot exudes elegance and is often favored by gentlemen who appreciate a polished appearance. This knot is wider and more symmetrical than the Half Windsor, making it a statement choice for special events.
This sophisticated knot is a must-learn for those seeking a refined and polished look. It adds a touch of class to any outfit and shows attention to detail. Practice tying the Full Windsor knot to ensure you can execute it with ease when the occasion calls for it.
Summing up
With these considerations in mind, learning how to tie a tie is an essential skill that can elevate your overall appearance and make a lasting impression. By following the step-by-step instructions and practicing the various knots, you can achieve a polished and professional look for any occasion. Remember to take into account the type of tie, collar style, and occasion when selecting the appropriate knot. By mastering the art of tying a tie, you can confidently dress to impress in any situation.